Month: October 2010

Pantry Pumpkin Chili

If you can operate a can opener, you can make this chili. And if you’re lucky, you’ll have all the ingredients right in your pantry. Last year, there was a pumpkin shortage but cans of pumpkin are back in stores now, so consider this a reason to stock up! Here’s what you need:

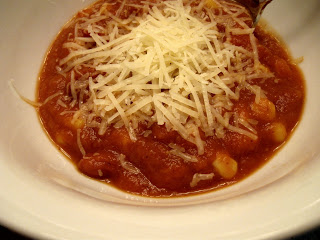
Just mix the pumpkin, diced tomatoes in juice, tomato sauce, beans (rinsed and drained), and the corn in a big pot. Add about a tablespoon of chili powder and simmer until heated through. That’s it!

The pumpkin flavor is subtle here, similar to this pumpkin chili made with ground turkey. And it’s definitely very thick! But served with some shredded cheese, it is a perfectly quick and healthy meal.

Pesto Mushroom Pasta

Back when the days were a little longer and the basil plant was thriving, a big batch of pesto was made. The pesto was promptly frozen in the sections of an ice cube tray, to be used at a later time. I didn’t write down the proportions of ingredients, and I can’t find any photos from the event, but I remember a lot of chopped basil, some olive oil, lemon juice, garlic, and Parmesan cheese thrown into the food processor. I was excited this week when I stumbled upon the cubes in my freezer and decided to defrost one for a pasta dish.

When the pesto was defrosted, it was still fairly thick, so I added a drizzle of olive oil and lemon juice. Unfortunately the pesto flavor got a little lost here, because the mushrooms were so dominant. While it was good, next time I want to make sure I choose a recipe where the pesto will shine – I am thinking about a pizza!

1 10 oz. package mushrooms
1 10 oz. package frozen chopped spinach, cooked and drained
1/2 c. orzo, cooked according to directions and drained
1 cube pesto
Olive oil
Lemon juice

Cook mushrooms in a large frying pan, until they are soft and release liquid. Add spinach, pasta, and pesto cube and stir until heated through. Add more olive oil and lemon juice if needed. Serve with freshly grated Parmesan cheese.

English Muffin Pizzas

I always loved making English Muffin pizzas as a kid. Actually, they are still fun to make!

My sister really came up with this concept for the party. First, we put a few spoonfuls of tomato sauce on each muffin half, and then sprinkled on some mozzarella cheese. The pizza faces were given olive eyes, a carrot nose, a green bean mouth, and mushroom eyebrows. We baked them at 350-400F for about 15 minutes, and a kid friendly lunch was served. But I saw plenty of adults grabbing for these as well!

Monkey Cupcakes

We weren’t sure if the monkey cake(s) were going to be enough to feed the crowd at the party, so on the same night, the dream team also made these monkey cupcakes from the blog yanowhatimean. To keep things simple, we used the exact same cake batter and frosting mix. Of course, my Mom still had to visit several stores to find the mini-Nilla wafers.

It took us a few tries to get things right, but then we were on a roll and formed an assembly line. We found it best to apply a relatively thick layer of frosting in order to embed the cookies. Plus, has anyone ever complained that a cupcake had too much frosting? Then, we used decorating gel to make the ears, nose, and mouth. The final product was cute, and the cupcakes were a hit with the kids at the party.

Monkey Cake(s)

Dear Connor,

The night before your first birthday party, we assembled in Grandma’s kitchen with a vision. We were going to make you a monkey cake. Actually, a 2-layer 9″ monkey cake for the adults, and a 5″ monkey smash cake just for you! We all loved the idea when we saw it on Smitten Kitchen.
There was a lot of preparation involved. Nancy stenciled some monkey faces on wax paper. Grandma got all the ingredients together, and did the actual baking. Mommy brought over her pretty cake stand. Auntie Kerry got to work with the mixer to put together the frosting, and then Nancy cut out the monkey ears using a juice glass.

We used wax paper under the first layer, to keep the cake stand clean of course. Instead of using toothpicks, we glued the monkey ears on with frosting. Then we put the lighter colored frosting on the monkey’s face. We had sprinkled powdered sugar around the stencil to serve as a guide.

Finally, we filled in the rest of the cake with chocolate frosting, and decorated the monkey faces on both cakes with gel. It was a great moment! We just sat back for a moment with a cup of coffee to admire our work.

The cakes were tucked away in the refrigerator for the night, and then we brought them to your house for the party the next day. It looks like you had as much fun eating your smash cake as we had making it!

Who knows what we’ll come up with for your birthday next year, but I am already looking forward to it!

Get out your cake pans!

In honor of the social event of the year – my nephew’s first birthday – I’ll be part of a team working to make the best birthday cake ever. You already know that I have an obsession with Smitten Kitchen, and she had to get all fancy, making the most adorable monkey cake, and now we’re going to try to replicate it.

I’ll be sure to tell you how it all went on Monday. Maybe you’ll see a picture of our monkey cake. Maybe you’ll see our backup plan. But I do promise a picture of the monkey himself, eating whatever cake it is that comes out of the kitchen.

Have a great weekend!

Cauliflower Chana Masala

There are a lot of things that I can make without a recipe, but this is the first time ever that I attempted to cook Indian food on the fly. It all started with a totally different cauliflower recipe that turned out so badly, I won’t even share it. Then I had half a head of cauliflower left, and decided I was in the mood for Indian food. But most Indian recipes seemed to pair cauliflower with potatoes, and I didn’t have any of those around. Long story short, that’s how this recipe was born. I followed the spice pattern of chana masala, but without the jalapeno heat. I can’t say this is authentic, but it made for a good meal served over brown rice.

1 T oil
1 onion, peeled and chopped
2 t minced garlic
1/2 head cauliflower, chopped
2/3 c. water, divided
1 T coriander
2 t paprika
2 t cumin
1 t garam masala
1/4 t cayenne pepper
1/4 t salt
1 (14 oz.) can diced tomatoes in juice
1 (15 oz.) can chick peas, rinsed and drained
1 T tomato paste

Heat oil in a large frying pan. Add onion and garlic, and cook for 10 minutes, or until softened. Add cauliflower and 1/3 c. water, cover pan, and cook for 5-7 minutes or until cauliflower is tender. Add spices, and stir to mix. Add tomatoes, chick peas, tomato paste, and remaining 1/3 c. water and simmer uncovered until heated through.

Spaghetti Squash with Mushroom Cream Sauce

Now that fall is really here, and I had to take the outer shell of my winter coat out of the closet, I am craving more warm comfort foods. This mushroom cream sauce, served over spaghetti squash, fit the bill perfectly. Of course, I paired it with a slice of whole wheat bread to soak up any sauce left in the dish!

This recipe is vegan, so there is no ‘cream’ at all. It calls for almond milk and good old fashioned cornstarch to thicken it up. I followed the recipe fairly closely, although I cooked the shallots along with the mushrooms, and left out the non-dairy creamer. You could make the mushroom sauce alone and serve it over pasta, but spaghetti squash is a nice alternative and makes this a vegetable packed meal. Plus, baking the spaghetti squash in the oven warms the house just a little bit before it’s time to turn the heat on!

Boston Local Food Festival

I was really excited this weekend to attend the Boston Local Food Festival! If you were in the Boston area, I assume you were there too, since the place was packed. I thought there was a good mix of vendors selling produce and food products, along with some booths set up for education about locally grown food. I wasn’t able to take any pictures, but you’re in luck because I know a blogger who did a nice write up on the event.

There were lots of samples, but my favorite was edamame hummus from Gourmet Recipes for One. I don’t always enjoy edamame, but here it was mixed with such wonderful ingredients. There were not that many vendors there with recipes, but her site has plenty of interesting ones.

While the festival showed a lot of support for local agriculture and restaurants which use local food, it’s just as important to demonstrate how to use locally grown food in their homes. And that’s what I try to do here as well, by showing you that an amateur cook like me can take quality ingredients and make them into a meal. I will mark my calendar for this event next year!