Monkey Cake(s)

Dear Connor,

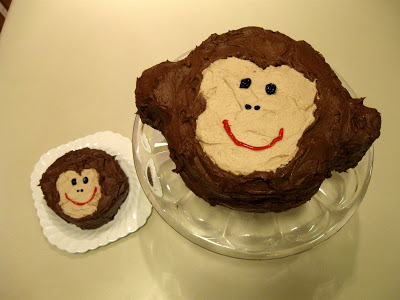
The night before your first birthday party, we assembled in Grandma’s kitchen with a vision. We were going to make you a monkey cake. Actually, a 2-layer 9″ monkey cake for the adults, and a 5″ monkey smash cake just for you! We all loved the idea when we saw it on Smitten Kitchen.
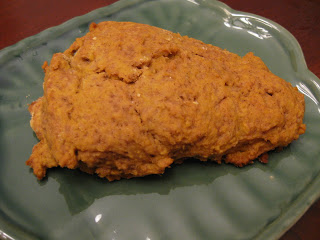
There was a lot of preparation involved. Nancy stenciled some monkey faces on wax paper. Grandma got all the ingredients together, and did the actual baking. Mommy brought over her pretty cake stand. Auntie Kerry got to work with the mixer to put together the frosting, and then Nancy cut out the monkey ears using a juice glass.

We used wax paper under the first layer, to keep the cake stand clean of course. Instead of using toothpicks, we glued the monkey ears on with frosting. Then we put the lighter colored frosting on the monkey’s face. We had sprinkled powdered sugar around the stencil to serve as a guide.

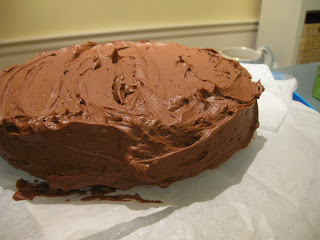
Finally, we filled in the rest of the cake with chocolate frosting, and decorated the monkey faces on both cakes with gel. It was a great moment! We just sat back for a moment with a cup of coffee to admire our work.

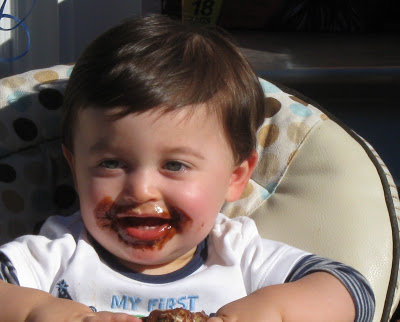
The cakes were tucked away in the refrigerator for the night, and then we brought them to your house for the party the next day. It looks like you had as much fun eating your smash cake as we had making it!

Who knows what we’ll come up with for your birthday next year, but I am already looking forward to it!

Get out your cake pans!

In honor of the social event of the year – my nephew’s first birthday – I’ll be part of a team working to make the best birthday cake ever. You already know that I have an obsession with Smitten Kitchen, and she had to get all fancy, making the most adorable monkey cake, and now we’re going to try to replicate it.

I’ll be sure to tell you how it all went on Monday. Maybe you’ll see a picture of our monkey cake. Maybe you’ll see our backup plan. But I do promise a picture of the monkey himself, eating whatever cake it is that comes out of the kitchen.

Have a great weekend!

Cauliflower Chana Masala

There are a lot of things that I can make without a recipe, but this is the first time ever that I attempted to cook Indian food on the fly. It all started with a totally different cauliflower recipe that turned out so badly, I won’t even share it. Then I had half a head of cauliflower left, and decided I was in the mood for Indian food. But most Indian recipes seemed to pair cauliflower with potatoes, and I didn’t have any of those around. Long story short, that’s how this recipe was born. I followed the spice pattern of chana masala, but without the jalapeno heat. I can’t say this is authentic, but it made for a good meal served over brown rice.

1 T oil
1 onion, peeled and chopped
2 t minced garlic
1/2 head cauliflower, chopped
2/3 c. water, divided
1 T coriander
2 t paprika
2 t cumin
1 t garam masala
1/4 t cayenne pepper
1/4 t salt
1 (14 oz.) can diced tomatoes in juice
1 (15 oz.) can chick peas, rinsed and drained
1 T tomato paste

Heat oil in a large frying pan. Add onion and garlic, and cook for 10 minutes, or until softened. Add cauliflower and 1/3 c. water, cover pan, and cook for 5-7 minutes or until cauliflower is tender. Add spices, and stir to mix. Add tomatoes, chick peas, tomato paste, and remaining 1/3 c. water and simmer uncovered until heated through.

Spaghetti Squash with Mushroom Cream Sauce

Now that fall is really here, and I had to take the outer shell of my winter coat out of the closet, I am craving more warm comfort foods. This mushroom cream sauce, served over spaghetti squash, fit the bill perfectly. Of course, I paired it with a slice of whole wheat bread to soak up any sauce left in the dish!

This recipe is vegan, so there is no ‘cream’ at all. It calls for almond milk and good old fashioned cornstarch to thicken it up. I followed the recipe fairly closely, although I cooked the shallots along with the mushrooms, and left out the non-dairy creamer. You could make the mushroom sauce alone and serve it over pasta, but spaghetti squash is a nice alternative and makes this a vegetable packed meal. Plus, baking the spaghetti squash in the oven warms the house just a little bit before it’s time to turn the heat on!

Boston Local Food Festival

I was really excited this weekend to attend the Boston Local Food Festival! If you were in the Boston area, I assume you were there too, since the place was packed. I thought there was a good mix of vendors selling produce and food products, along with some booths set up for education about locally grown food. I wasn’t able to take any pictures, but you’re in luck because I know a blogger who did a nice write up on the event.

There were lots of samples, but my favorite was edamame hummus from Gourmet Recipes for One. I don’t always enjoy edamame, but here it was mixed with such wonderful ingredients. There were not that many vendors there with recipes, but her site has plenty of interesting ones.

While the festival showed a lot of support for local agriculture and restaurants which use local food, it’s just as important to demonstrate how to use locally grown food in their homes. And that’s what I try to do here as well, by showing you that an amateur cook like me can take quality ingredients and make them into a meal. I will mark my calendar for this event next year!

Cabot Bean Cheese Spirals

This was a meal that was easy to make and so much fun to eat! But first, thanks to Cabot Cheese for sponsoring a seminar on children’s nutrition which I recently attended. I learned a lot, but one of the key messages is never to assume that a child won’t like a particular food, or a certain flavor. Kids really do like variety, and they need repeated exposure to become comfortable with new foods.

As a participant in the seminar, I received a coupon for Cabot Cheese, which I used to purchase my favorite 75% reduced fat cheddar. It is one of the best reduced fat cheeses out there, and yes, it melts! I also turned to the Cabot recipes for some new ideas, and saw these adorable Bean Cheese Spirals.

OK, so mine aren’t quite as cute as the ones pictured on the website, but they were still great and made a fun ‘appetizer-style’ dinner. You are never too old to enjoy eating with your fingers. Have a great weekend!

Feta and Spinach Orzo

So I already mentioned I spent much of Sunday at the Patriot’s game, right? But I still needed to prepare some lunches for the week, so when I got home, I headed to the kitchen. Less than an hour later, the kitchen was cleaned up and I had 4 plastic containers filled with an orzo dish inspired by this recipe.

The end result was another meal that could be enjoyed hot or cold. When it was hot, the feta really stood out. And when it was cold, I tasted more of the spinach and lemon. But either way, it was really good. It is worth taking the time to grate the lemon rind, trust me.

1 c. orzo
1 T olive oil
1 small onion, peeled and chopped
1 shallot, peeled and chopped
2 T flour
1 1/2 c. vegetable broth
1 lemon
1 10 oz. package frozen spinach, thawed and drained
1 c. fat free feta

Cook orzo according to package directions and drain.

In the meantime, heat the olive oil in a large saucepan. Add the onion and shallot, and saute for 10 minutes, or until soft. Stir in the flour, and gently pour in the vegetable broth, whisking until blended. Grate the rind of the lemon and add it to the pan, along with the juice from half of the lemon. Simmer for 10-15 minutes, or until thickened.
Add spinach and cooked orzo to the pan, and stir to combine. Cook until heated throughout.

Zucchini with Cashew Sauce

The recipe that inspired this one is both vegan and raw, and could be considered a zucchini alfredo. Gena’s recipes are fantastic, but I altered this one to fit my craving for a warm meal and the ingredients I had on hand. The final product was neither vegan nor raw, but you could easily leave the cheese out to make it vegan. For me, the addition of the Parmesan and Italian seasoning really made the dish stand out.

This was perfect for a light dinner with a piece of Italian bread, but would also make a nice first course for a larger meal. It’s a modern twist on classic Italian. Oh, and you can find raw cashews in the bulk bin of Whole Foods and other stores.

1 c. raw cashews, soaked in water for 2 hours and drained
1/3 c. lemon juice
1/3 c. water
1 T Parmesan cheese
1 t sea salt
1 t Italian seasoning
2 large zucchini, sliced thinly and steamed lightly

Place cashews, lemon juice, water, Parmesan cheese, salt, and Italian seasoning in a food processor. Blend until smooth. Spoon sauce over zucchini, and add freshly ground black pepper if desired.

Pumpkin Scone

Another flashback, but this time to a recipe that I made in the earliest days of the blog. The first time I tried these was before I even had a digital camera. I can’t believe it took me this long to make these pumpkin scones again, but I’m glad I did.

There’s nothing artificial here, just butter, sugar, flour, and the like. Plus pumpkin of course. They have the texture of a muffin, but are much less sweet. Perfect for anytime of day!